Language
Ship to  United Kingdom , USD
United Kingdom , USD
United Kingdom , USD

New customer? Start here.
My Account My Orders My Wishlist My Coupons My Points My Referrals BGpay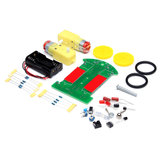 18% OFF
Tracking Patrol Lline Intelligen tRobot Car DIY Kit With Reduction Motor
US$8.99
US$10.99
View It
18% OFF
Tracking Patrol Lline Intelligen tRobot Car DIY Kit With Reduction Motor
US$8.99
US$10.99
View It

| Our Company | Contact Us | Payment & Shipping | Partnership Programs |
|---|---|---|---|